
For my smart home, I have a mixture of devices using 433 Mhz (aka Nexa), Z-wave, and Ikea Trådfri (running the ZigBee protocol). Until recently, I’ve been using Ikea’s Trådfri Gateway for the Trådfri devices. The Gateway should in theory support all kinds of ZigBee devices including Philips Hue, Xiaomi Aqara, etc., but I was looking for a more generic solution to cover them all. I decided to go with a ConBee II stick and the deCONZ software, both provided by Phoscon.
This guide should help you to replace an Ikea Trådfri Gateway with the deCONZ solution, but it can also help you set it all up from scratch.
Install deCONZ
First things first. Connect the ConBee II USB stick to your Home Assistant box. In my case, I’m running Hassio in Docker on a virtual Ubuntu server in my VMware environment, which requires some knowlagde in how to connect a USB device to a VM (whish I will not cover in this guide).
Once the USB stick is mounted to your Home Assistant box, reboot the system.
Now you should be good to go with the installation. Sign in to Home Assistant and go to Hass.io, Add-on Store, and install the deCONZ add-on.
To be able to start deCONZ, you need to configure what USB device to use. Go to Hass.io, System, Hardware and find the path to your device. Copy it!
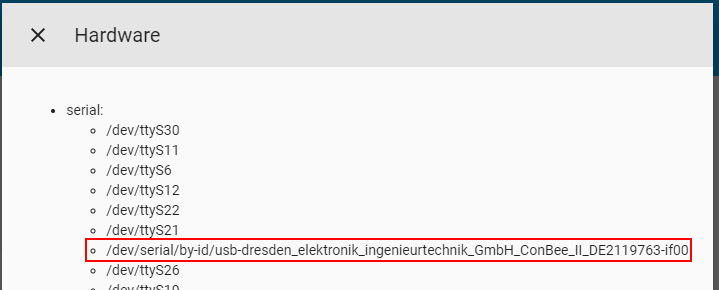
Note that the path is (in my case) actually a symlink. For me, it worked using the path shown in the image above, but I looked up the real path on my Ubuntu server and used that instead.
root@SERVER:/usr/share/hassio/homeassistant# ls -lh /dev/serial/by-id/
lrwxrwxrwx 1 root root 13 Aug 31 23:27 usb-dresden_elektronik_ingenieurtechnik_GmbH_ConBee_II_DE2119763-if00 -> ../../ttyACM0
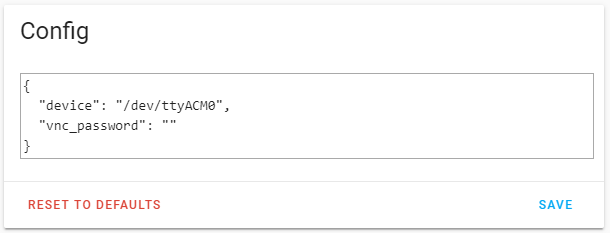
Now, go to Hass.io, deCONZ, Config, scroll down to the configuration part, enter the path within quotes and click on Save.
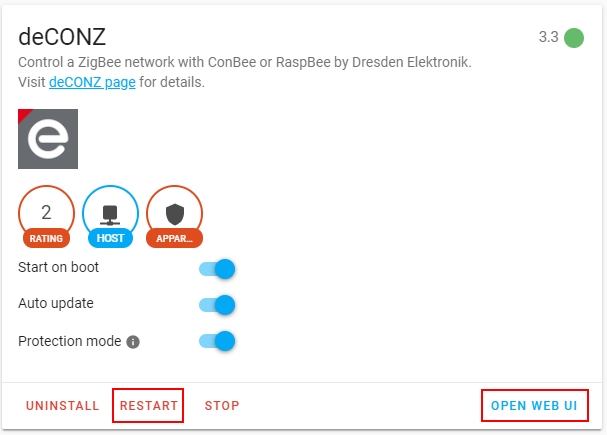
Scroll back up to the top, restart deCONZ and open the Web UI (remember to change the URL if you’re like me and running Home Assistant behind a reverse proxy).
Now you should be presented with a setup guide. You can leave the host name as default, or choose whatever you like. Select a password and click on Next.
Chose to continue without setting up any lights. I found out it was much easier to do it inside the application later on. Don’t create any groups either. You want to keep using Home Assistant for grouping.
Now, deCONZ is setup and ready to be configured. First, we need to get rid of the old Ikea integration (if you have it setup).
Remove old Ikea Trådfri configuration
Go back to Home Assistant and to Hass.io, Automation, Ikea Trådfri and delete the integration using the trash bin icon in the top right corner. Then, factory reset any Trådfri remotes by pushing the button underneath the back plate 4 times within 5 seconds. Try out the remote to see that it does not trigger any lights no more. At last, turn off the Trådfri Gateway.
Now we’re ready to setup the Trådfri devices in deCONZ.
Add Trådfri devices to deCONZ
Lets’ start with an Ikea Trådfri Driver. In deCONZ, pull out the left menu with the hamburger icon in the top left, then go to Lights, and Add new lights.
Now comes the tricky part. For the driver to enter pairing mode, it must be factory reseted. Using a paper clip, hold down the reset button on the driver for 10 seconds. The lights connected to the driver should make an indication in any way. If everything goes right, the driver should appear in deCONZ, but please be patient! For me, it took several seconds after the driver entered pairing mode until it apperad in the application. During my testings, I sometimes even needed to try pair it several times.
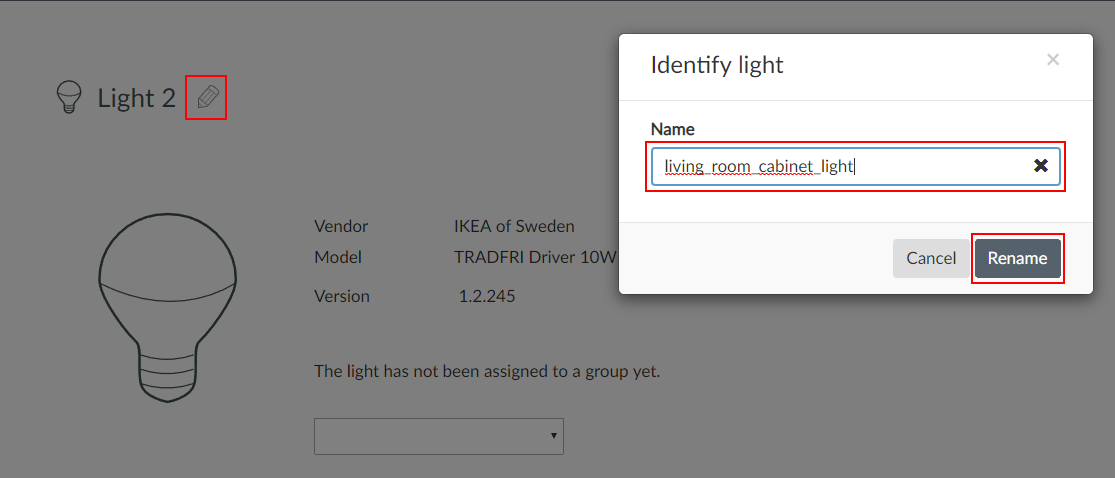
When the driver finally appears, click on it to open it, click the pen icon next to the name, give it a name and click on Rename.
Now let’s move on with an Ikea Trådfri Wireless Control Outlet. Once again, open the left menu and go to Lights and Add new light (yes – we will add the outlet as a light). As for the driver, the outlet must enter pairing mode which is done by factory reset the outlet. Using a paper clip, hold down the factory reset button for 10 seconds. The LED on the outlet will indicate that the device has entered pairing mode (the outlet will also cut the electrical output for a short moment of time, so you might want to disconnect any devices connected to the outlet). Again, have patiance for the device to appear in deCONZ. You might need to try more then once.
When the outlet appears, click on it to open it, click the pen icon next to the name, give it a name and click on Rename.
Continue adding any more Trådfri (or ZigBee) devices that you might have. I havn’t had the oppertunity to add a Trådfri sensor yet, but I assume that the procedure is the same – in deCONZ, select to add a sensor and then do a factory reset on the sensor itself.
When you’re done, restart Home Assistant for all devices to show up. If you have given the devices the same name as you had in the Trådfri Gateway, all your cards and automations should be working as before.
Trådfri Remote
What about the Trådfri Remote that you’ve used before? The nice thing about the ConBee stick is that it communicates directly with the Trådfri devices without the need of a remote (which the gateway needs).
If you still want to use a remote to manually control your devices, it has to be added to deCONZ. In deCONZ, open the left menu, go to Switches, Add new switch and select the approperiate remote. Pair the remote by pressing the button on the back 4 times within 5 seconds. For me, it took several times before the remote actually paired with the ConBee stick, so be patient!
Once the remote is paried, go ahead and click on it to open it, click the pen icon next to the name, give it a name and click on Rename. Now, go back to the mainpage and you will notice that a group for the remote has been automatically created. Simply add any devices you want the remote to control to this very group by first clicking on the group, then Edit, Manage lights and on any light you want to control.
Now, go ahead and try out the remote. It will hopefully work in perfect harmony with Home Assistant!


Hi Lucas,
Thank you for a very informative post and many good comments.
I am migrating slowly out of the Ikea Tradfri, and just now added my first Ikea 5-button controller to a Conbee II. I tried a few times, at one point I looked into the Devices->Swiches section, and there it was 🙂
The Phoscon software reports this:
Vendor IKEA of Sweden
Product TRÅDFRI remote control
Version 2.3.014
I used ZHA protocol in the past but saw that Ikea bulbs disconnected from the network after a couple of weeks. Is this solution more stable? Did you encounter any disconnecting devices on Deconz?
I have been using deCONZ and Home Assistant for a year or so. Never encountered any disconnection. I however changed from running deCONZ within Home Assistant to a Docker based deCONZ outside of HA to be able to use the deCONZ API (which in HA is disabled due to the new Ingress mode).
Hi,
I have successfully added ikea switches to deconz/phoscon
I wanted to use the switches to control other things within home assistant.
But I cannot see the switches outside of deconz… Surely it must be possible to use a zigbee switch to whatever I want or?
Best regards
Peter
What kind of switch are you referring to? If you are referring to their remotes, you should be able to use the five button remote for whatever you want in HA. I just checked my remote, and it’s available within HA to do whatever automation I like. I also have the two button remote in possession, which however does not seems to be programmable within HA.
I am also using HA and deCONZ for multiple sensors. Taking the IKEA Gateway out of the way sounds like a good proposition, however I am also using Google Home in parallel. I assume without the IKEA Gateway the Google Home integration will not work. Any solution to such (my) use case?
Yes, Home Assistant is perfectly capable of publishing a hole lot of things to Google Home. The only integration I have configured in my Home app is the one to Home Assistant. HA then brings me access to all my sensors, lights, HVAC, scenes, etc., through GH.
Either you configure the link manually, or you pay for the Nabi Casa service and let them handle the link. It’s all in the HA documentation.