

Today we’re going to talk about reverse proxy with fully automated SSL certificate handling. We’re going to take a look into HAProxy and Let’s Encrypt in conjunction.
First some relevant background information. Why would you want a reverse proxy? There could be numerous reasons like
- Load balancing a service between multiple servers
- Do SSL offloading (i.e. handle all certificates and encryption on one server only)
- Publish multiple services with the same port number on a single IP
For my home environment, I need a reverse proxy mainly for publishing multiple services using the same port on a single external IP. To achive that, I have implemented HAProxy to look at the header and redirect the traffic based on that. Since all traffic is passing throught HAProxy, I decided to handle all my certificates there as well.
The solution will look something like this:
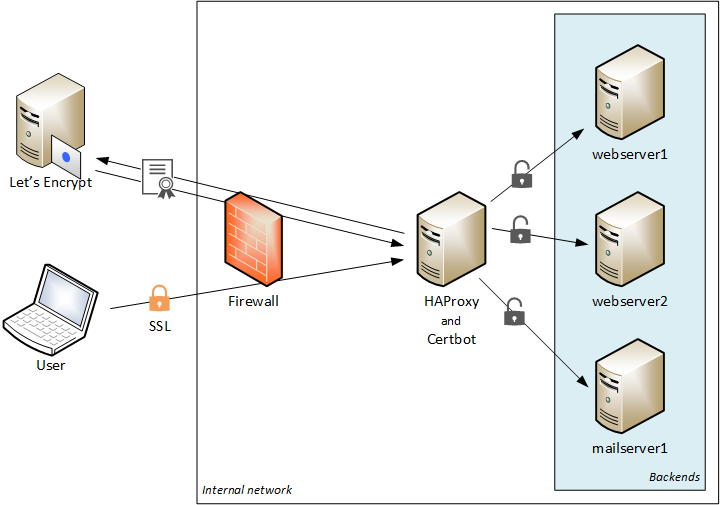
Configure HAProxy
I won’t cover all the details on how to install HAProxy. There are plenty of great guides out there in how to install and configure the basics.
Frontends
This is what the clients will communicate with. We’ll have to configure one frontend for each port we want to publish. I have configured two frontends, one for HTTP and one for HTTPS.
HTTP
This frontend listens for connections on port 80. I have configured it to redirect all incoming requests to HTTPS.
# HTTP Frontend
frontend http-in
    bind *:80

    # Redirect to HTTPS
    redirect scheme https
HTTPS
This frontend listens for connections on port 443. It will also handle the SSL encryption. Here, I have setup a set of ACLs to redirect the traffic to the correct backend server based on the header sent by the client. I.e. if a client brows to https://myapp1.domain.com/index.html, HAProxy will read that address and redirect the traffic to webserver1. I have also configured a fallback destination to use if no ACL applies.
# HTTPS Frontend
frontend https-in
    bind *:443 ssl crt /etc/ssl/mycertificate.pem

     # ACLs
    acl acl_myapp1    hdr_end(host) -i myapp1.domain.com
    acl acl_myapp2    hdr_end(host) -i myapp2.domain.com
    acl acl_mail      hdr_end(host) -i mail.domain.com

    # Rules
    use_backend webserver1_http if acl_myapp1
    use_backend webserver2_http if acl_myapp2
    use_backend mailserver1_http if acl_mail

    # Fallback rule
    default_backend webserver1_http
Backends
Now that we are having our frontends setup, HAProxy can communicate with a client and it also knows what to look for to determine the end destination. Now we need to configure these destinations, called backends.
# Backends
backend webserver1_http
    server webserver1.domain.com 192.168.1.1:80

backend webserver2_http
    server webserver2.domain.com 192.168.1.2:80

backend mailserver1_http
    server mailserver1.domain.com 192.168.1.3:80
Now we should have a working configuration, except for the SSL part.
Configure Let’s Encrypt
To start of with, we must install Certbot. Certbot will be used to communicate with Let’s Encrypt using ACME. On an Ubuntu server, run the following command:
apt install certbot
Now, here’s the problem. When trying to issue a standard certificate (not a wildcard certificate), the Certbot will be instructed to place a file in the requested domain’s web server root in order for Let’s Encrypt to validate that you actually own the domain in question. When Let’s Encrypt trying to read the file, HAProxy will treat the traffic as any client and redirect it to a backend – where ther is neither Certbot nor a validation file.
We somehow need to tell HAProxy that ACME traffic must remain in HAProxy. We also need to instruct Certbot where to place the validation file. Luckily, this guy has built a plugin to HAProxy that handles it.
Install ACME Validation Plugin
Download the plugin, extract it and place it in HAproxy’s configuration folder. On an Ubuntu server, run the following commands:
cd
wget https://github.com/janeczku/haproxy-acme-validation-plugin/archive/master.zip
unzip master.zip
mv master/acme-http01-webroot.lua /etc/haproxy
mv master/cert-renewal-haproxy.sh /etc/haproxy
The bash script will handle the certification issuing process by talking to Let’s Encrypt, placing the validation file in the correct folder, reload HAProxy, etc. The LUA script will then handle the ACME traffic and make sure to serve the validation file to Let’s Encrypt (instead of redirecting the traffic to a backend server).
Put the following in haproxy.cfg to start using the LUA script:
global
    ...
    lua-load    /etc/haproxy/acme-http01-webroot.lua
# HTTP Frontend
frontend http-in
    ...
    # ACME Handler for Lets Encrypt
    acl url_acme_http01 path_beg /.well-known/acme-challenge/
    http-request use-service lua.acme-http01 if METH_GET url_acme_http01
Now, reload HAProxy.
systemctl reload haproxy
So far so good! Now we should be able to issue a certificate, but don’t do it yet! We need to alter the bash script a bit.
First you need to understand how Certbot and HAProxy works. When issuing a certificate, Certbot will place it in a folder specific for that domain. It will also keep the certificate and the private key apart. HAProxy on the other hand needs to have all the parts in one single PEM file. It also need to know the full path to the file.
Of course, the author of the script thought about this and implemented a solution that merges the certificate and the key into a single PEM file. The issue with this is that those PEM files will still be located in separate folders specific to each domain. Practically this means that you have to tell HAproxy about each and every of your PEM files. This is not a problem if you only have one domain and one certificate, but most probably that’s not the case.
Luckily, HAProxy can include a whole folder with PEM files, meaning that you can add or remove certificates on the fly. HAProxy will use SNI to determine what certificate to serve to the client based on the requested domain name.
For this to work, we need to tell the bash script to place the merged PEM file in a common folder. In cert-renewal-haproxy.sh, replace the line
cat ${le_cert_root}/${domain}/privkey.pem ${le_cert_root}/${domain}/fullchain.pem | tee ${le_cert_root}/${domain}/haproxy.pem >/dev/null
with
cat ${le_cert_root}/${domain}/privkey.pem ${le_cert_root}/${domain}/fullchain.pem | tee ${le_cert_root}/pem/${domain}.pem >/dev/null
Now, when a certificate is renewed, the merged PEM file will be stored as www.domain.com.pem in a folder called pem, located in Certbot’s live folder (e.g. /etc/letsencrypt/live). Before we continue, we need to create this folder.
mkdir /etc/letsencrypt/live/pem
Install Certificate
Now it’s finally time to install a certificate! Run the following commands to issue a certificate and create the PEM file for HAProxy:
certbot certonly --text --webroot --webroot-path /var/lib/haproxy -d www.domain.com --renew-by-default --agree-tos --email [email protected]
cat /etc/letsencrypt/live/www.domain.com/privkey.pem /etc/letsencrypt/live/www.domain.com/fullchain.pem > /etc/letsencrypt/live/pem/www.domain.com.pem
Re-run the commands at any time to issue a new certificate.
Now when we have at least one certifiate in our pem folder, we need to configure HAProxy to use these certificate(s).
Change the following in haproxy.cfg:
# HTTPS Frontend
frontend https-in
        bind *:443 ssl crt /etc/letsencrypt/live/pem/
And reload HApxory (don’t forget to reload HAProxy each time you issue a new certificate).
systemctl reload haproxy
Now give it a try! You should reach your backend service as well as being presented with a valid certificate.
Configure Automatic Renewal
Now when we’re have everything up and running, there’s one step left – the automatic renewal process.
When installing Certbot, a cron task is automatically beeing added to the system to handle certificate renewals. This will only renew certifcates and not create any PEM files, nor will it reload HAProxy. For this, we need to alter the cron task to run our awesome bash script instead.
In /etc/cron.d/certbot, replace the line
0 */12 * * * root test -x /usr/bin/certbot -a \! -d /run/systemd/system && perl -e 'sleep int(rand(43200))' && certbot -q renew
with
0 */12 * * * root /etc/haproxy/cert-renewal-haproxy.sh
That’s it! We now have a reverse proxy in place that automatically handles everything around SSL as well as publishing various services on the same frontend.


Great tutorial, worked perfectly on my setup.
Thank you Lucas
Great…. after spending a couple of days writing my own entire letsencrypt container system with cron… there’s a haproxy plugin ?!?!!! Doh ! Thanks, this looks perfect. Was useful to know all the background though. 🙂
Actually, my system is a bit better (docker based), but some of these scripts and hints are very useful for me to finish it off. Also, I must add that in recent releases of HaProxy there is now a way to replace the ssl cert in memory without restarting haproxy, by calling its own little API. I will try and work that into my system also. If you ever update this article, you could add it.
Thanks for your feedback!
I have actually abandoned the stand-alone HAProxy and Let’s Encrypt for the docker based SWAG from linuxserver.io. SWAG uses Nginx as reverse proxy and have Let’s Encrypt built’in. The only thing you need is to specify the (sub) domains as Docker variables, and inside the container there are tons of Nginx example configurations for things like Home Assistant, Apache web server, Grafana, etc. It’s easy to add your own configuration as well.
Check it out here: https://docs.linuxserver.io/general/swag
Great tutorial, and pretty unique. I did not find any comparable tutorial for letsencrypt with HAproxy.
But cause letsencrypt allows wildcard certificates in the meantime, how does the command under “Install Certificate” need to be modified to get a wildcard certificate for *.domain.com?
just writing “… -d *.domain.com…”, “… -d “*.domain.com”…”, “… -d ‘*.domain.com’…” or “… -d \*.domain.com…” causes an error message: Client with the currently selected authenticator does not support any combination of challenges that will satisfy the CA. You may need to use an authenticator plugin that can do challenges over DNS.
Let’s Encrypt’s wildcard certificate can’t be verified and issued through a web challenge, but through a DNS challenge only. As such, you need to somehow alter the script to create/update a DNS record at your DNS provider.
You can read more about it here: https://community.letsencrypt.org/t/acme-v2-production-environment-wildcards/55578
Getting a wildcard vertificate is pretty easy and nicely discribed here:
https://www.interserver.net/tips/kb/lets-encrypt-wildcard-certificate-certbot/
– install letsencrypt and certbot
– use this command: certbot certonly –agree-tos –email [email protected] –manual –preferred-challenges=dns -d *.example.com –server https://acme-v02.api.letsencrypt.org/directory
– if you get follwing information:
———————————————————————————
Please deploy a DNS TXT record under the name
_acme-challenge.example.com with the following value:
Before continuing, verify the record is deployed.
———————————————————————————
create a TXT record in your DNS server with this key for the hostname “_acme-challenge.example.com”. Make shure the new record is availabel, e.g with “dig +short _acme-challenge.example.com”. If you get the key as answer, you can continue with generating the certificate.
That’s it, just have to figure out how to renew automatically…
One possiblity could be creating the record and just update the content by menas DATA with a script at the moment the certificate needs to be updated and delet the content again afterwards.
At least for some dynDNS services this should work.